As you know, photography is the art of writing with light, so making pictures with poor lighting would be something like doing with the minimum elements that can be used. The fact is that taking pictures in poor lighting conditions is a practice that all must carry out at some point in our learning because it is a challenge to our knowledge and a challenge to creativity.
Whether a sunset and / or sunrise, a night landscape or a scene in a dimly lit interior, this type of situation requires us to be familiar with the basics of photographic technique to know how to apply correctly and obtain correct images without jitter and the necessary sharpness.
In this article we will talk about what the are keys to achieving such photographs broadly, showing how to act when we are in situations where there is very little light and we want to take a picture. However, what will list may be perfectly transferable to other outlets such as images in low key or long exposure photography, areas where normally we also find low light and we have to apply similar resources.
The necessary elements
To successfully tackle such situations is essential to have a proper equipment, basically a camera that allows us to shoot in manual mode and RAW format. In addition, it is also advisable to have a sensor that offers a good response by shooting at high sensitivities and possibility of firing in burst.
As the objective is obvious that our recommendation is to have a set of lenses as light as possible, i.e. with a diaphragm ƒ2.8 or greater and preferably with stabilizer including (the camera is also useful). In the field of accessories, tripod would surely be the most important element that would add an external remote trigger and, in certain cases, an external flash.
How to set up the camera
For shooting in low light is almost essential shoot in manual mode to conveniently choose settings triangle of exposure, you know diaphragm, shutter speed and ISO sensitivity, depending on the prevailing light. Certainly we are assuming you already know these concepts well, but outside if not we will refer to our photography course.
As we are talking about situations with little light, except that we use the flash will have no choice but to open the diaphragm as far as possible, use a slow shutter speed or increase the sensitivity of the sensor … Or maybe all three at the same time, everything will depend on the situation as we tell you then.
You may also like to read another article on BlogsMujer: Keys to achieve better portraits by taking advantage of natural light
Indoor Settings
If we are in a dimly lit interior, we have several possibilities. If we want, one option is to use the flash, but in this case we discourage that usually comes in the chamber for its limited scope and it would be better to use an external one to which we can attach a diffuser to soften the light beam and avoid artificial result.
Although it is normal that we not use the flash but try to capture the atmosphere according to the light we have. For this, we will have, as we said before, to resort to ISO pull, diaphragm or speed. Here come into play the tripod, because if we have it (or some other element that will help us support) can perform a long exposure by avoiding having to increase the sensitivity or open the aperture value.
If this is not the case, and we have to take the shot at hand, we will have to employ a relatively high speed according to the focal element we use and photographed to prevent image blur. Of course, it is not the same to photograph a still life as a scene in which there are animated elements.
Shooting by hand almost certainly we will have to pull the other two components of the triangle to achieve adequate exposure. Thus, we can open the aperture to the maximum and / or increase the sensitivity until it is sufficient for decision. Always taking into account what happens in each case.
As you know, a diaphragm open to the maximum produces a certain loss of sharpness and, above all, that there is less depth of field. On the other hand, raising the sensitivity of the image sensor causes, from a certain level, the always undesirable noise in the image to appear. It is true that sometimes this noise can serve to give character to the image and that with the photo processing programs can be partially corrected, but normally too noticeable noise is not desirable.
In any case, l choice of these adjustments will depend on our team and the specific situation , so that sometimes having bought this worthy goal 50 mm with a diaphragm ƒ1.4 will save us from the situation and others not enough and Will have to open diaphragm and still shoot an ISO above 3,200, a figure that is usually not recommended to exceed.
Outdoor Settings
If we like street photography and we chose to practice at night or when there is little light, that is before perfectly valid with the peculiarity that here will be almost impossible to use a tripod so that there will be no choice but to compensate Diaphragm base and ISO.
Still, it is highly recommended to seek support for photos, for example by supporting our body on any piece of furniture, trying to relax the body and gently squeezing the trigger while expel air slowly (and after making a deep breath). It is also useful to shoot in burst to get several simultaneous shots because it is likely that the second and consecutive shots will out better than the first shot.
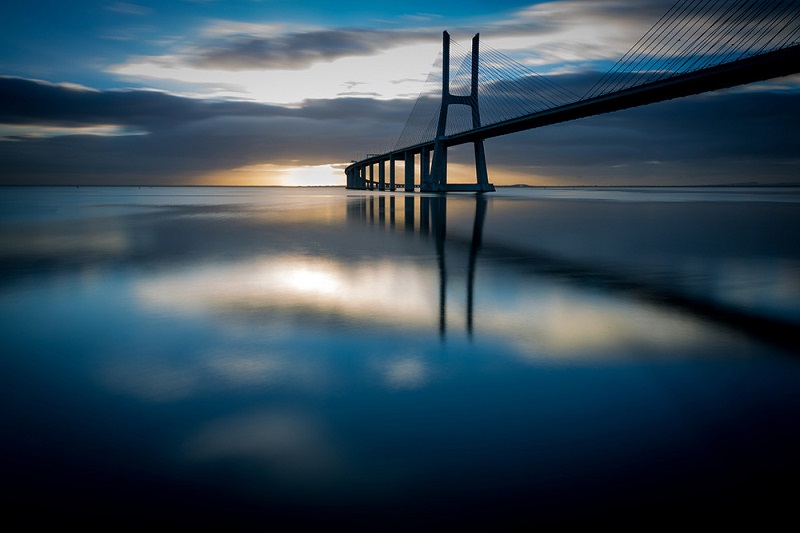
If what we like is to capture pictures of city lights or the starry heavens night here and we put the tripod into the equation so that we can draw on the techniques long exposure that allow us to close diaphragm and not have Which raise the sensitivity a lot. This is also true for what is known as light painting and consisting of light areas of a photo with flashes of light during long exposure.
Other general advice
Finally, we offer a list of small tips for shooting in very low light situations:
- Focus in these situations can be very difficult for our camera so a good trick to these cases can be used an auxiliary light with which we can focus preferably in manual mode and then turn off before taking the picture.
- Given the need to raise the ISO to higher levels than recommended, when there is no choice but our advice is do not cut. Better a picture with no noise.
- If you have to use the flash and have no diffuser can resort to bounce light off a white surface as may be the ceiling of the room.
- Use a slow exposure time, although this will make the final image appears trepidation, it can be a creative resource so neither despise and try to see what results you get.
- Seize the stabilizer of the camera and / or target to shoot at lower than recommended speeds. If on the other hand you use tripod make sure to disable it.
- And above all do not be afraid to go wrong. You will have to fail many times (and in fact it is the best way to learn).