You’ve been scrolling through Instagram, saving wedding photos that take your breath away—lush floral arches, dreamy draped ceilings, and glowing candlelit tablescapes. Then reality sets in. You check your wedding budget, and the numbers don’t even come close to what those picture-perfect setups seem to cost. The frustration is real: how can anyone create that level of visual magic without draining their savings account?
Here’s what makes it worse. The wedding industry thrives on making you believe that stunning decor requires a five-figure budget. Vendors price “Instagram-worthy” setups at premium rates, and social media influencers rarely disclose that their dreamy backdrops were sponsored or cost thousands. This pressure pushes couples into overspending, going into debt, or settling for decor that feels underwhelming—none of which should be part of your happiest day.
The good news? Creating affordable wedding decorations that photograph beautifully is absolutely achievable. With strategic planning, creative sourcing, and a few insider tricks, you can design a wedding that fills your feed with stunning photos — all while staying comfortably within budget. This guide breaks down exactly how to do it, with real cost estimates, comparison tables, and actionable ideas that eco-conscious couples will love.
What Makes Wedding Decorations Look Expensive on Instagram?
The secret behind Instagram-worthy wedding photos isn’t always expensive decor — it’s intentional design. Professional photographers and stylists know that certain visual elements consistently photograph well regardless of their price tag. Understanding these principles is the first step toward creating affordable wedding decorations that look like they cost ten times more than they actually did.
Three elements drive that high-end look on camera: layered lighting, repetition of simple elements, and cohesive color palettes. A single expensive floral arrangement can look underwhelming in photos, while a hundred tea candles from the dollar store create a warm, luxurious glow that captivates every viewer. Repetition — think rows of identical glass vases, uniform paper lanterns, or matching fabric drapes — creates a sense of abundance that the camera loves.
Color cohesion ties everything together. When every element in your frame shares a deliberate palette (even if individual pieces are inexpensive), the overall effect reads as polished and professionally designed. This is why so many budget-savvy couples achieve stunning results by choosing two to three colors and sticking to them religiously.
How Can You Build a Photo-Worthy Ceremony Backdrop on a Budget?
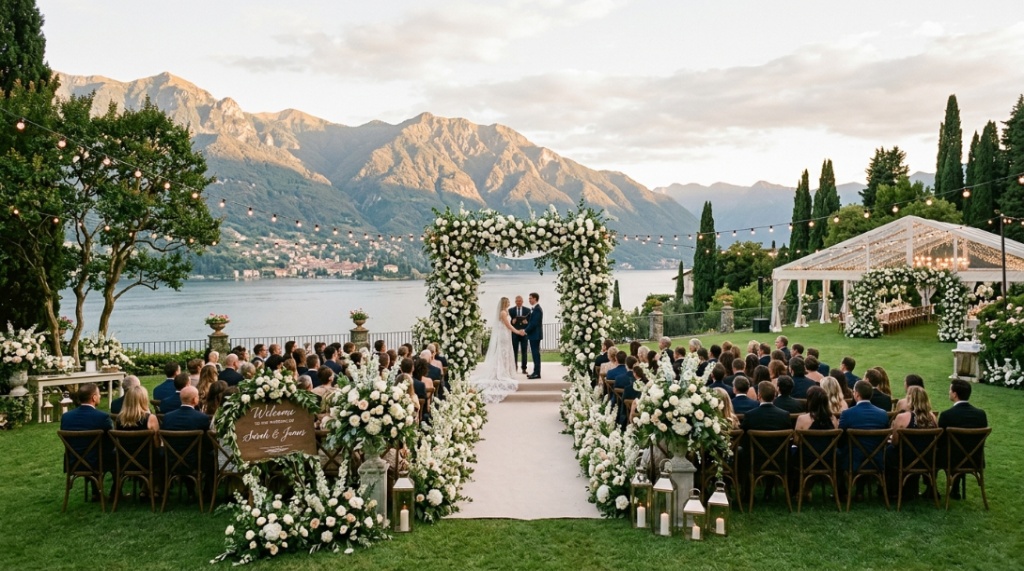
Your ceremony backdrop appears in nearly every photo from your wedding day, making it the single highest-impact decoration investment. Fortunately, it’s also one of the easiest places to save money while still creating something show-stopping. The key is choosing one dramatic focal point rather than spreading your budget thin across dozens of small details.
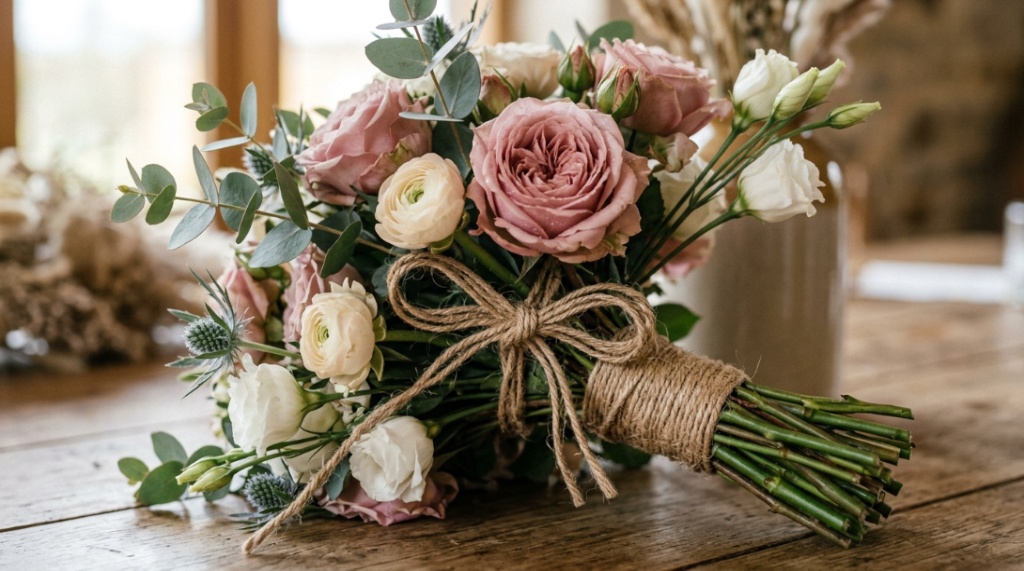
A DIY floral arch using a rented or purchased metal frame ($30–$60) dressed with grocery store greenery and a handful of statement blooms delivers serious impact. Eucalyptus bundles from wholesale markets cost around $5–$8 per bunch and photograph with a lush, organic look that rivals expensive florist arrangements. Add silk flowers at strategic focal points where guests won’t touch them, and even close-up photos won’t reveal the difference.
Alternatively, fabric-based backdrops create incredible depth in photographs. A simple wooden frame draped with thrifted sheer curtains ($10–$20 from estate sales) and strung with warm fairy lights ($8–$15 per strand) produces that soft, romantic glow that earns thousands of likes. For outdoor ceremonies, nature itself becomes your backdrop—position your altar in front of a treeline, garden wall, or lake view and add minimal accents to frame the scene.
Which Budget-Friendly Centerpieces Get the Most Engagement on Social Media?
Centerpieces are the unsung heroes of wedding Instagram posts because guests photograph them constantly throughout the reception. The most-shared styles right now combine natural textures with ambient lighting — think collected glass vessels, seasonal greenery, and clusters of candles at varying heights. These elements cost a fraction of traditional floral centerpieces while creating far more visual interest on camera.
The collected vessel approach works brilliantly: gather mismatched glass bottles, jars, and bud vases from thrift stores (typically $1–$3 each), spray paint them in a unified metallic or matte finish if desired, and fill with single stems or small greenery cuttings. Grouped in clusters of five to seven vessels, these create a lush, curated look that photographs beautifully from any angle. Total cost per table: $15–$25 versus $150+ for traditional floral arrangements.
Candle-focused centerpieces are equally photogenic and even simpler. Pillar candles of varying heights placed on mirror tiles or wooden slices create warm, flattering light in evening photos. During golden hour, they add a romantic glow without competing with natural light. If your venue allows open flames, this approach costs approximately $10–$20 per table and consistently produces stunning photos.
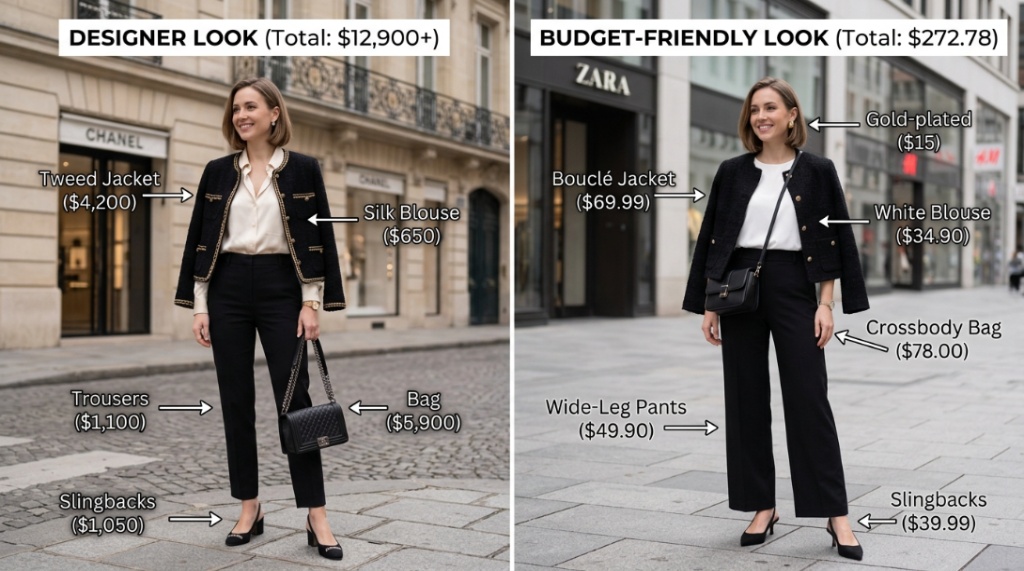
Creating a stunning aesthetic isn’t just about the venue; it’s also about how everything blends together, including the guest attire. While planning your palette, you might wonder about guest etiquette rules, such as can you wear black to a wedding, and how those fashion choices impact your overall event photos. Balancing these style elements ensures your day looks cohesive and picture-perfect without breaking the bank.
How Do You Create an Instagram-Worthy Reception Space Without a Decorator?
Professional wedding decorators charge $2,000–$10,000+ for reception styling, but their core techniques are surprisingly accessible. The secret is thinking in zones rather than decorating every square inch uniformly. Create three to four highly styled photo zones and keep the rest clean and minimal—your photos will look incredible, and your budget stays intact.
Your priority zones should include the sweetheart or head table, a feature wall or photo backdrop for guests, the dessert or cake display, and one signature installation (like a hanging element or illuminated sign). Concentrating your budget and creative energy on these four areas ensures every photo from your wedding has at least one stunning backdrop, while areas that rarely get photographed (like hallways or restroom entrances) stay simple.
For couples planning a home celebration, you can explore budget-friendly wedding decorations for a home party that transform any residential space into a photo-ready venue. The right combination of lighting, textiles, and focal pieces makes even a backyard feel like a curated event space.
Hanging installations create the biggest visual impact per dollar spent. Paper honeycombs, tissue paper pom-poms, or folded origami cranes suspended at varying heights above the dance floor cost under $50 total but create a ceiling scape that looks absolutely magical in photos—especially when lit from below with uplighting.
What Are the Best Affordable Wedding Decoration Ideas Compared?
To help you plan and prioritize, here’s a detailed comparison of Instagram-worthy decoration ideas ranked by visual impact, cost, and ease of DIY execution. Use this table to mix and match elements that fit your budget and skill level.
| Decoration Idea | Estimated Cost | Instagram Impact | DIY Difficulty | Best For |
|---|---|---|---|---|
| DIY Floral Arch (greenery + silk flowers) | $60–$120 | ★★★★★ | Moderate | Ceremony backdrop, couple photos |
| Fairy Light Canopy / Curtain | $30–$75 | ★★★★★ | Easy | Reception ceiling, head table backdrop |
| Thrifted Glass Vase Centerpiece Clusters | $15–$25 per table | ★★★★☆ | Easy | Table decor, detail shots |
| Paper Lantern / Pom-Pom Ceiling Installation | $40–$60 total | ★★★★☆ | Easy | Dance floor, wide reception shots |
| Candle + Mirror Tile Tablescape | $10–$20 per table | ★★★★★ | Very Easy | Evening receptions, moody aesthetics |
| Draped Fabric Feature Wall | $25–$50 | ★★★★☆ | Easy | Photo booth backdrop, selfie station |
| Oversized Balloon Garland | $35–$70 | ★★★★★ | Moderate | Entrance, dessert table, photo ops |
| Wooden Sign Collection (hand-lettered) | $15–$40 | ★★★☆☆ | Moderate | Welcome area, bar signage, seating chart |
As you can see, the highest-impact elements—fairy light canopies, floral arches, and candle-heavy tablescapes—are all achievable for under $120 each. By combining three or four of these elements strategically across your venue, you create a space that looks fully designed and professionally styled in every photo.
How Can Eco-Friendly Choices Actually Improve Your Wedding Aesthetic?
Sustainability and visual appeal aren’t opposing forces—in fact, eco-friendly decoration choices often produce more photogenic results than conventional alternatives. Natural, organic materials carry a texture and warmth that plastic and synthetic decor simply can’t replicate on camera. This is great news for budget-conscious couples who also care about their environmental footprint.
Potted plants instead of cut flowers serve as both decor and guest favors, eliminating waste while creating lush green tablescapes. Herbs like rosemary and lavender in terracotta pots ($3–$5 each) add fragrance, color, and rustic charm that photographs beautifully. After the wedding, guests take them home and think of your celebration every time they water their plant.
Secondhand and repurposed materials carry a patina and character that brand-new decor lacks. Vintage books as table risers, reclaimed wood as signage, antique frames as table numbers — these elements create the layered, lived-in aesthetic that currently dominates wedding Instagram trends. Thrift stores, estate sales, and Facebook Marketplace are goldmines for these items at pennies on the dollar.
Beeswax or soy candles in reusable holders, fabric bunting that can be re-gifted, and digital invitations that eliminate paper waste all reduce your footprint while maintaining (or enhancing) visual quality. The “imperfect,” organic look of sustainable decor is precisely what makes modern wedding photos feel authentic rather than staged.
What Photography Tricks Make Budget Decor Look High-End?
Even the most budget-friendly wedding decor can photograph like a luxury event when you understand a few styling and photography principles. These tricks cost nothing extra but dramatically elevate how your decorations appear on screen — which is ultimately what matters for your Instagram feed and photo album.
Depth of field is your best friend. When photographers shoot with a wide aperture (blurred background), even simple decorations become dreamy focal points. Communicate with your photographer about which decor elements you’re most proud of, and ask them to capture those with shallow depth of field for maximum impact.
Golden hour timing transforms absolutely everything. Schedule your couple’s portraits and key reception moments during the hour before sunset, when warm light makes every surface glow. Fairy lights, candles, metallic accents, and glass elements all become exponentially more photogenic in soft, directional evening light. This costs zero dollars but can be the difference between ordinary and extraordinary photos.
Styling flat lays of your detail elements (invitation suite, rings, flowers, and shoes arranged artistically) gives you additional Instagram content that showcases your decorative choices up close. Set aside 15 minutes on your wedding day for your photographer to capture these compositions—they’re among the most-shared wedding images on social media.
Where Should You Source Materials for Affordable Wedding Decorations?
Strategic sourcing is what separates a $500 decor budget from a $5,000 one — without any visible difference in the final photos. Knowing where to find materials at the lowest cost (without sacrificing quality) is essential for creating affordable wedding decorations that genuinely impress.
Wholesale flower markets offer blooms at 60–80% less than retail florists. Many cities have public wholesale markets where anyone can buy; others require a simple reseller certificate. Buying flowers two days before your wedding and conditioning them yourself saves hundreds while giving you access to the same premium stems florists use.
Dollar stores and discount retailers carry glass cylinders, votive holders, battery-operated candles, table runners, and frame sets that serve as perfect bases for elevated decor. With a coat of spray paint or some added greenery, these $1–$3 items become indistinguishable from boutique wedding supply purchases.
Buy/sell/trade wedding groups on Facebook are treasure troves of barely-used decor from recent brides selling entire setups at 50–75% off retail. Items like lanterns, table numbers, signage, and arch frames get posted daily. Similarly, rental companies offer end-of-season sales where you can purchase items that have been gently used at deep discounts.
Nature itself provides free decor materials that are inherently photogenic: collected pinecones, dried grasses, pressed leaves, wildflower bundles, driftwood pieces, and river stones all create organic, editorial-quality arrangements at no cost. For eco-conscious couples, foraged elements carry meaningful stories and minimal environmental impact.
How Do You Plan a Decoration Timeline That Prevents Last-Minute Overspending?
One of the biggest budget killers in wedding decor isn’t the initial plan — it’s the panic purchases made in the final weeks when gaps become apparent. A clear decoration timeline prevents impulse buying and ensures you have everything sourced, tested, and ready well before your wedding day.
Three to four months out: Finalize your color palette, create a mood board, and identify your four priority photo zones. Begin sourcing thrifted items, watching for sales, and collecting vessels and holders. Order any custom signage or printed materials.
Six to eight weeks out: Complete a full mock-up of at least one tablescape to verify proportions and aesthetics. Test your DIY skills on the floral arch or largest installation. Photograph your mock-up to confirm it achieves the Instagram look you’re after—adjust before committing to multiples.
Two to three weeks out: Purchase all remaining consumables (candles, ribbon, tape, wire). Confirm your floral order or wholesale market visit date. Pack all decor into labeled boxes organized by zone for efficient setup day.
Day before / day of: Assign specific setup tasks to your wedding party or coordinator. Provide printed photos of each completed zone so helpers can replicate your vision without you directing every detail. This frees you to enjoy your morning rather than stress-arranging centerpieces.
Can You Really Get Instagram-Worthy Results for Under $500 Total?
Absolutely — and many couples do. A total decoration budget of $300–$500 is realistic when you combine thrifted materials, DIY installations, strategic lighting, and natural elements. Here’s a sample breakdown for a 50-guest wedding that would photograph beautifully:
- Metal arch frame (rented or purchased secondhand): $35
- Greenery and accent blooms for arch: $60
- Fairy light strands (4 sets): $40
- Thrifted glass vessels for 6 tables: $45
- Pillar candles and votives: $35
- Fabric for draping (thrifted sheer curtains): $20
- Paper lanterns for ceiling: $25
- Signage materials (wood slices, paint markers): $20
- Table runners and napkins (bulk purchase): $40
- Photo backdrop materials: $30
- Miscellaneous (tape, wire, zip ties, hooks): $20
Total: approximately $370 — leaving room for last-minute additions or unexpected needs. This budget covers the ceremony backdrop, reception tablescapes, a ceiling installation, ambient lighting throughout, signage, and a dedicated photo wall. Every single element is designed to photograph beautifully and create cohesive, shareable content for your wedding Instagram.
The key insight is that budget-friendly wedding decor doesn’t mean compromising on visual impact. It means being intentional about where your money goes, choosing elements that multiply their effect through lighting and repetition, and understanding what actually makes photos look stunning versus what the wedding industry tells you is necessary.
Frequently Asked Questions
How far in advance should I start collecting decor items for my wedding?
Start collecting three to four months before your wedding date. This gives you enough time to thrift strategically, watch for sales, test DIY projects, and replace anything that doesn’t work—without the pressure of last-minute panic buying that leads to overspending.
Are silk flowers noticeable in wedding photos?
High-quality silk flowers are virtually undetectable in photos, especially when mixed with real greenery. The key is choosing “real touch” varieties with natural-looking stems and avoiding overly uniform or glossy petals. Place silk blooms in areas guests won’t handle up close, like arches and elevated arrangements.
What’s the single most impactful affordable decoration for Instagram photos?
String lights and fairy lights deliver the highest Instagram impact per dollar. They create a warm ambient glow, add depth and sparkle to every photo, flatter skin tones, and work in any venue—indoor or outdoor. A $30 investment in quality fairy lights transforms an entire space.
How do I make a backyard wedding look elegant in photos?
Focus on defined zones with intentional styling rather than scattering decor everywhere. Use draped fabric to create visual boundaries, add uplighting to trees and architectural features, keep the color palette tight, and ensure the lawn is well-maintained. A clean, cohesive backyard setup often photographs better than a cluttered ballroom.
Can I reuse or return wedding decorations after the event?
Yes—plan for this from the start. Rent large items like arches and furniture, buy candles and textiles that you can use in your new home, and sell themed items in wedding resale groups within a week of your event while they’re still trending. Many couples recoup 40–60% of their decor budget through resale.
What color palettes photograph best for social media?
Neutral bases (white, cream, sage, and terracotta) with one or two accent colors consistently perform well on Instagram because they create clean, airy compositions that read clearly on small screens. Avoid overly busy palettes with more than three dominant colors, which can look chaotic in photos.
Do I need a professional to set up DIY wedding decorations?
Not necessarily, but you do need a clear plan and reliable helpers. Create setup guides with photos for each zone, assign specific tasks to designated people, and build in extra time for troubleshooting. Consider hiring a day-of coordinator ($300–$500) specifically for setup oversight if your decor plan is complex—it’s still far cheaper than hiring a full decorator.